Chưa có sản phẩm trong giỏ hàng.
Khám phá hướng dẫn sử dụng cho máy lạnh di động Whirlpool

28
Th4
Th4
Không thể bỏ lỡ
- Hướng dẫn nấu trứng vịt lộn hầm ngải cứu đơn giản bổ dưỡng tại nhà
- Cách đọc tên hãng máy lạnh AQUA (SANYO)
- Đồng hồ Orient của nước nào, ưu điểm và dòng sản phẩm nổi bật
- Hệ điều hành Android Tivi 8.0 có gì đặc biệt?
- Top 4 máy lạnh khuyến mại lớn tháng 10/2017
- Ăn gì vào Tết Đoan Ngọ (Tết giết sâu bọ) mùng 5 tháng 5?
- [Video] Cách làm bánh mì nướng muối ớt đang gây bão ở Sài Gòn
- Đánh giá OPPO R7 Lite – Đỉnh cao thiết kế phân khúc tầm trung
- Cách tải ứng dụng tivi Samsung JU6600
- Top 5 nồi cơm điện đáng mua tháng 10
Đánh giá Sổ tay người dùng cho Máy điều hòa Di động Whirlpool #WhirlpoolPortableAirConditioner #UserManual #SafetyInstructions #GroundingMethod #PowerSupplyCord #InstallationRequirements #DuctMountingInstallation #WindowSliderKitInstallation #WindowDuctInstallation #WallExhaustInstallation #DrainHoseInstallation #UsingYourAirConditioner #TemperatureIndicator #ButtonFunctions #FilterReset #FanSpeed #Mode #Sleep #UsingTheRemoteControlTiêu đề: Một Hướng dẫn Toàn diện về việc Sử dụng Máy điều hòa Di động Whirlpool Giới thiệu: Whirlpool là một thương hiệu nổi tiếng cung cấp các giải pháp làm mát hiệu quả và sáng tạo. Trong bài viết này, chúng tôi cung cấp cho bạn một sổ tay người dùng để vận hành Máy điều hòa Di động Whirlpool, đảm bảo bạn tận dụng tối đa khả năng của nó để tạo ra một môi trường sống thoải mái. Phần 1: Mở hộp và Thiết lập Khi nhận được Máy điều hòa Di động Whirlpool của bạn, hãy mở hộp cẩn thận và kiểm tra tất cả các phụ kiện so với hướng dẫn sử dụng sản phẩm. Đảm bảo rằng không có phần nào bị thiếu hoặc hỏng. Theo hướng dẫn chi tiết, lắp ráp đơn vị theo các biểu đồ cung cấp và kết nối các thành phần cần thiết. Phần 2: Cài đặt Chọn một vị trí phù hợp cho máy điều hòa của bạn, tốt nhất là gần cửa sổ, vì nó cần truy cập đến không khí tươi và một ống thoát khí. Sử dụng bộ cài đặt cửa sổ đi kèm, kín cửa sổ, đảm bảo sự kín đáo và an toàn. Điều này sẽ ngăn không cho không khí bên ngoài xâm nhập và làm giảm hiệu suất làm mát. Phần 3: Chức năng và Bảng điều khiển Hãy làm quen với bảng điều khiển của Máy điều hòa Di động Whirlpool. Thường bao gồm các nút để điều chỉnh nhiệt độ, tốc độ quạt, chế độ chọn, và một công tắc nguồn. Hiểu rõ các chức năng và biểu tượng được hiển thị trên bảng để vận hành hiệu quả. Phần 4: Chế độ Vận hành Máy điều hòa Di động Whirlpool cung cấp các chế độ vận hành khác nhau để phù hợp với nhu cầu làm mát của bạn. Khám phá các tùy chọn như Chế độ Làm mát, Chế độ Quạt, và Chế độ Hút ẩm, hiểu rõ sự khác biệt và ưu điểm của mỗi chế độ. Chọn chế độ phù hợp dựa trên sở thích và điều kiện môi trường. Phần 5: Điều chỉnh Nhiệt độ và Tốc độ Quạt Đạt được mức độ thoải mái mong muốn dễ dàng với Máy điều hòa Di động Whirlpool. Điều chỉnh nhiệt độ bằng cách sử dụng các nút tăng và giảm nhiệt độ, chọn mức ưa thích của bạn. Tương tự, điều chỉnh tốc độ quạt để kiểm soát cường độ luồng không khí, tùy chỉnh nó theo ý thích để có hiệu suất làm mát tối ưu. Phần 6: Chức năng Hẹn giờ và Chức năng Sleep Tận dụng chức năng hẹn giờ và chức năng sleep tích hợp của Máy điều hòa Di động Whirlpool để tăng tiện ích và hiệu quả năng lượng. Sử dụng hẹn giờ để lên kế hoạch vận hành tự động hoặc tắt máy theo thói quen hàng ngày của bạn. Kích hoạt chế độ sleep để vận hành yên tĩnh hơn và kiểm soát nhiệt độ chính xác khi bạn nghỉ ngơi. Phần 7: Bảo dưỡng và Chăm sóc Để đảm bảo Máy điều hòa Di động Whirlpool của bạn luôn có hiệu suất tối đa, quan trọng là phải thực hiện bảo dưỡng đều đặn. Vệ sinh bộ lọc không khí định kỳ để ngăn chặn tích tụ bụi và đảm bảo luồng không khí hiệu quả. Ngoài ra, kiểm tra xem có bất kỳ rò rỉ hoặc không ổn định nào, và liên hệ với trung tâm dịch vụ ủy quyền nếu cần. Kết luận: Bằng cách tuân thủ sổ tay người dùng toàn diện này, bạn hiện có kiến thức cần thiết để vận hành Máy điều hòa Di động Whirlpool của mình một cách hiệu quả. Hãy tận hưởng không gian sống thoải mái và mát mẻ, cảm ơn hiệu suất làm mát đáng tin cậy và các tính năng thân thiện với người dùng của thiết bị xuất sắc này. Máy điều hòa Di động Whirlpool Sống kèm Máy điều hòa Di động Whirlpool CẢNH BÁO AN TOÀN HƯỚNG DẪN AN TOÀN QUAN TRỌNG CHO Máy điều hòa Di động Whirlpool CẢNH BÁO: Để giảm nguy cơ cháy, giật điện hoặc chấn thương khi sử dụng máy điều hòa của bạn, hãy tuân theo những biện pháp phòng ngừa cơ bản này: Trẻ em cần được giám sát để đảm bảo rằng họ không chơi với thiết bị. Thiết bị này được thiết kế để sử dụng trong nhà. Nếu dây nguồn bị hỏng, nó phải được thay thế bởi nhà sản xuất hoặc đại lý dịch vụ hoặc một người có trình độ tương đương. Xử lý thiết bị: Khi cần vứt bỏ thiết bị, hãy tham khảo với đại lý địa phương của bạn hoặc trung tâm tái chế địa phương để biết thông tin về cách vứt bỏ thiết bị một cách có trách nhiệm với môi trường. Hãy tái chế hoặc vứt bỏ vật liệu bao bì cho sản phẩm một cách có trách nhiệm với môi trường. PHỤ KIỆN VÀ ĐẶC ĐIỂM CHÚ Ý: Mô tả trong sổ tay người dùng này (văn bản và hình ảnh) có thể có chút khác biệt so với mẫu bạn đã mua. Dải nhiệt độ hoạt động của máy điều hòa là 60°F-90° F (16°C-32°C) khi ở chế độ làm mát, vượt ra khỏi dải nhiệt độ này, máy có thể không hoạt động đúng cách. Phụ kiện Máy điều hòa Di động Whirlpool Phương pháp tiếp đất được đề xuất Máy điều hòa phải được tiếp đất. Máy điều hòa này được trang bị một dây nguồn có cắm 3 chân tiếp đất. Để giảm thiểu nguy cơ giật điện, dây nguồn phải được cắm vào một ổ cắm 3 chân tiếp đất và tiếp đất theo tất cả các quy định và quy tắc địa phương. Nếu không có ổ cắm phù hợp, trách nhiệm của khách hàng là phải có một ổ cắm 3 chân tiếp đất đúng cách được lắp đặt bởi một người lắp đặt điện có trình độ. Trách nhiệm thuộc về khách hàng: Liên hệ với một người lắp đặt điện có trình độ. Đảm bảo rằng cài đặt điện là đủ và tuân thủ Quy tắc Điện Quốc gia, ANSI/NFPA 70 – phiên bản mới nhất, và tất cả các quy định và quy tắc địa phương. Cáp nguồn LƯU Ý: Cáp nguồn máy điều hòa của bạn có thể khác với cáp trong hình ảnh. Máy điều hòa di động này được trang bị một cáp nguồn cần thiết theo tiêu chuẩn UL. Cáp nguồn này chứa công nghệ hiện đại để phát hiện rò rỉ dòng điện. Nếu cáp bị hỏng, hệ thống sẽ ngắt nguồn vào máy. Để kiểm tra cáp nguồn của bạn: Cắm cáp nguồn vào ổ cắm tiếp đất 3 chân. Nhấn nút RESET (trên một số mẫu máy, đèn xanh sẽ sáng). Nhấn nút TEST. Nhấn và thả nút RESET.Cáp nguồn của bạn đã sẵn sàng hoạt động. YÊU CẦU CÀI ĐẶT Yêu cầu Về Điện Năng Khách hàng nên có nguồn điện xác định, như được nêu trên tem của máy điều hòa. Khách hàng phải sử dụng một mạch riêng và ổ cắm tiếp đất phù hợp với phích cắm của máy điều hòa. Thiết bị phải được cài đặt theo quy tắc và quy định điện quốc gia và địa phương. Phích cắm phải dễ dàng tiếp cận sau khi cài đặt. Yêu cầu Về Vị Trí QUAN TRỌNG: Tuân thủ tất cả các quy tắc và quy định chính thức. Kiểm tra vị trí mà máy điều hòa sẽ được cài đặt. Đảm bảo mọi thứ cần thiết cho cài đặt đúng đắn có sẵn. Cài đặt máy điều hòa di động ở một vị trí phẳng và mở nơi không có ống thoát không khí bị cản trở. Giữ cách ly tối thiểu từ tường hoặc các chướng ngại khác, như hình ảnh hiển thị. Cần một sàn phẳng với độ dốc tối đa 10 độ so với mặt phẳng ngang để đặt máy. HƯỚNG DẪN CÀI ĐẶT Cài đặt Ống thoát cho Chế độ làm mát và khô, ống thoát phải được cài đặt, trong khi ở chức năng quạt, ống thoất không được yêu cầu. Ống thoát có thể được nén hoặc căng đều. Không nên vươn ra quá mức hoặc bẻ ống thoát. Ống thoát có thể được kết nối với cửa sổ hoặc qua tường ra ngoài toà nhà. Theo yêu cầu, bạn có thể lắp đặt với phụ kiện đi kèm đơn vị. Lắp đặt bộ chuyển đổi A và bộ chuyển đổi B (miệng phẳng hoặc tròn) lên ống thoát, như hình ảnh. Kết nối ống thoát với chân cắm thiết bị ở phía sau đơn vị. Trượt bộ chuyển đổi A xuống cho đến khi nó khóa vào vị trí. Lắp đặt Kit trượt cửa sổ Cắt bộ keo cách nhiệt (loại dán) thành độ dài phù hợp và gắn nó vào khung cửa sổ. Gắn Kit trượt cửa sổ vào khung cửa sổ. Điều chỉnh độ dài của Kit trượt cửa sổ: Lỏng vít A để điều chỉnh độ dài của Kit trượt cửa sổ sau đó vặn chặt vít khi độ dài phù hợp. LƯU Ý: Độ dài của Kit trượt cửa sổ là từ 67,5 cm đến 120 cm. . Nhẹ nhàng hạ cửa sổ. Gắn bảng thông gió vào vị trí với 4 ốc vít loại B, cộng thêm một ốc vít cho mỗi phần mở rộng. Cắt phin keo B (không dính) với độ rộng của cửa sổ. Gắn phin keo B giữa kính và cửa sổ để ngăn không khí và côn trùng xâm nhập vào phòng. Lắp đặt khung giữ an toàn với ốc vít loại B, như hình dưới đây. Lắp đặt ống thoát qua cửa sổ Di chuyển đơn vị với ống thoát đóng gói bên cạnh cửa sổ, sau đó kết nối bộ chuyển đổi B (miệng phẳng) của ống thoát với cửa sổ, như hình ảnh. Lắp đặt giếng thông gió trên Tường Chuẩn bị một lỗ trên tường. Lắp đặt bộ chuyển đổi thông gió trên tường bằng cách sử dụng 4 lỗ ốc mở rộng và ốc vít loại C, đảm bảo nó được gắn chặt. Kết nối ống thoát với bộ chuyển đổi thông gió trên tường, như hình ảnh.LƯ
#WhirlpoolPortableAirConditioner #UserManual #SafetyInstructions #GroundingMethod #PowerSupplyCord #InstallationRequirements #DuctMountingInstallation #WindowSliderKitInstallation #WindowDuctInstallation #WallExhaustInstallation #DrainHoseInstallation #UsingYourAirConditioner #TemperatureIndicator #ButtonFunctions #FilterReset #FanSpeed #Mode #Sleep #UsingTheRemoteControl
Title: A Comprehensive Guide to Using the Whirlpool Portable Air Conditioner
Introduction:
Whirlpool is a renowned brand offering efficient and innovative cooling solutions. In this article, we provide you with a user manual for operating the Whirlpool Portable Air Conditioner, ensuring you maximize its potential for a comfortable living environment.
Section 1: Unboxing and Setup
Upon receiving your Whirlpool Portable Air Conditioner, carefully unbox and check all its contents against the product manual. Ensure that no parts are missing or damaged. Following the detailed instructions, assemble the unit following the provided diagrams and connect the necessary components.
Section 2: Installation
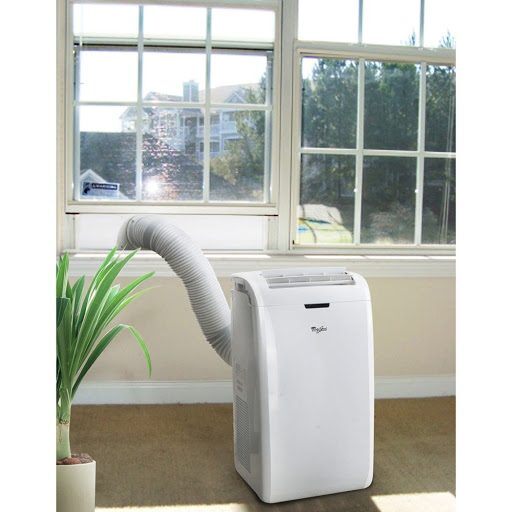
Select a suitable location for your portable air conditioner, preferably near a window, as it requires access to fresh air and an exhaust outlet. Utilizing the included window installation kit, seal the window opening, ensuring a tight and secure fit. This will prevent any outside air from entering and compromising the cooling efficiency.
Section 3: Functionality and Control Panel
Familiarize yourself with the control panel of the Whirlpool Portable Air Conditioner. It typically includes buttons for adjusting temperature, fan speed, mode selection, and a power switch. Understand the functions and symbols displayed on the panel to effectively operate the appliance.
Section 4: Operating Modes
The Whirlpool Portable Air Conditioner offers various operating modes to suit your cooling needs. Explore the options such as Cool mode, Fan mode, and Dehumidify mode, understanding the differences and advantages of each. Choose the appropriate mode based on your preferences and environmental conditions.
Section 5: Temperature and Fan Speed Adjustment
Achieving the desired comfort level is effortless with the Whirlpool Portable Air Conditioner. Adjust the temperature using the temperature up and down buttons, selecting your preferred level. Similarly, regulate the fan speed to control the airflow intensity, tailoring it to your liking for optimal cooling.
Section 6: Timer and Sleep Functions
Take advantage of the built-in timer and sleep functions of the Whirlpool Portable Air Conditioner for enhanced convenience and energy efficiency. Utilize the timer to schedule automatic startup or shutdown of the appliance according to your daily routine. Activate the sleep mode for a quieter operation and precise temperature control while you rest.
Section 7: Maintenance and Care
To ensure your Whirlpool Portable Air Conditioner remains in peak condition, it is important to perform regular maintenance. Clean the air filters periodically to prevent dust accumulation and ensure efficient airflow. Additionally, check for any potential leaks or irregularities, and contact an authorized service center if necessary.
Conclusion:
By following this comprehensive user manual, you now possess the necessary knowledge to operate your Whirlpool Portable Air Conditioner effectively. Enjoy a comfortable and cool living space, all thanks to the reliable cooling performance and user-friendly features of this exceptional appliance.

Whirlpool Portable Air Conditioner
Whirlpool Portable AIR CONDITIONER SAFETY
IMPORTANT SAFETY INSTRUCTIONS Whirlpool Portable Air Conditioner
WARNING: To reduce the risk of fire, electrical shock or injury when using your air conditioner, follow these basic precautions:
- Children should be supervised to ensure that they do not play with the appliance.
- This unit is designed for indoor use only.
- If the power supply cord is damaged, it must be replaced by the manufacture or its service agent or a similar qualified person.
Disposing of the unit:
- When you need to dispose of the unit, consult with your local dealer or local recycling center for information on how to dispose of the unit in a environmentally responsible manner.
- Please recycle or dispose of the packaging material for product in an environmentally responsible manner.
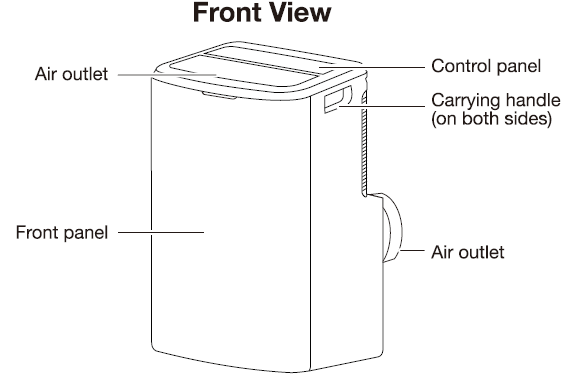
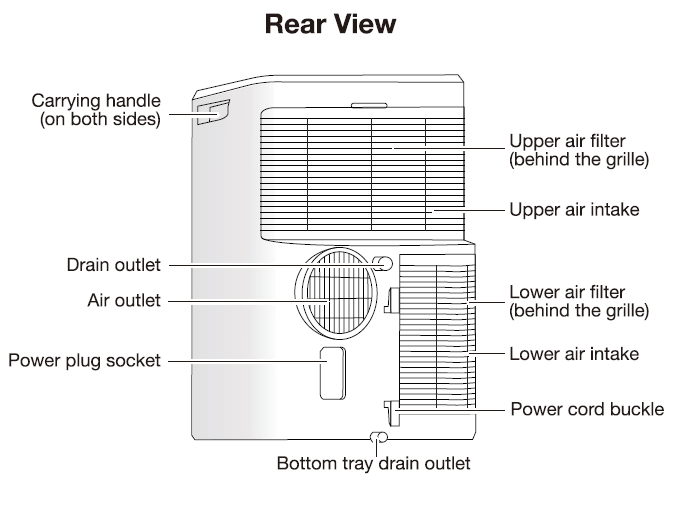
PARTS AND FEATURES
NOTE:
- The descriptions in this user manual (text and figures) may vary slightly from the model you purchased.
- The working temperature range of the air conditioner is 60°F-90° F (16°C-32°C) under cool mode, beyond this temperature range, the machine may not work properly.
Accessories Whirlpool Portable Air Conditioner
Recommended Grounding Method
The air conditioner must be grounded. This air conditioner is equipped with a power supply cord with a grounded 3-prong plug. To minimize possible shock hazard, the cord must be plugged into a grounded 3-prong outlet, and grounded in accordance with all local codes and ordinances. If a mating outlet is not available, it is the customer’s responsibility to have a properly grounded 3-prong outlet installed by a qualified electrical installer. It is the customer’s responsibility:
- To contact a qualified electrical installer.
- To ensure that the electrical installation is adequate and in conformance with National Electrical Code, ANSI/NFPA 70 – latest edition, and all local codes and ordinances.
Power Supply Cord
NOTE: Your air conditioner’s power supply cord may differ from the one shown. This portable air conditioner is equipped with a power supply cord required by UL. This power supply cord contains state-of-the-art electronics that detect current leakage. If the cord is damaged, the electronics will shut off power to the unit.
To test your power supply cord:
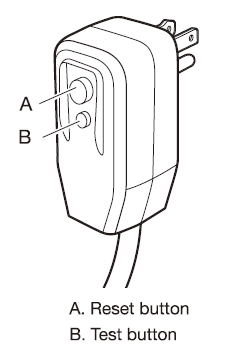
- Plug the power supply cord into a grounded 3-prong outlet.
- Press RESET button (on some models, a green light will turn on).
- Press TEST button.
- Press and release RESET button.
The power supply cord is ready for operation.
INSTALLATION REQUIREMENTS
Electrical Requirements
- The customer should have a specified power supply, as stated on the tag of the air conditioner.
- The customer must use a dedicated circuit and efficient grounding outlet matching with the plug of the air conditioner.
- The appliance should be installed in accordance with national and local wiring regulations.
- The plug should be easily accessible after installation.
Location Requirements
IMPORTANT: Observe all governing codes and ordinances.
Check the location where the air conditioner will be installed. Ensure everything necessary for the correct installation is available.
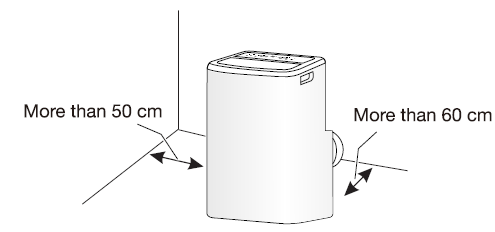
- Install the mobile air conditioner in a flat and open location where the air outlets will not be obstructed.
- Keep the minimum clearance from walls or other obstacles, as shown.
- A level floor is required with maximum gradient of 10 degrees with the horizontal plane is required to place the unit.
INSTALLATION INSTRUCTIONS
Duct Mounting Installation
- In cool and dry mode, the exhaust duct needs to be installed, while in fan mode, the exhaust duct is not required.
- The exhaust duct can be moderately compressed or tensed. Do not excessively stretch or bend the exhaust duct.
- The exhaust duct can be connected with windows or vented through the wall to the exterior of the building. As per requirement, you can make the installation with accessories provided along with the unit.
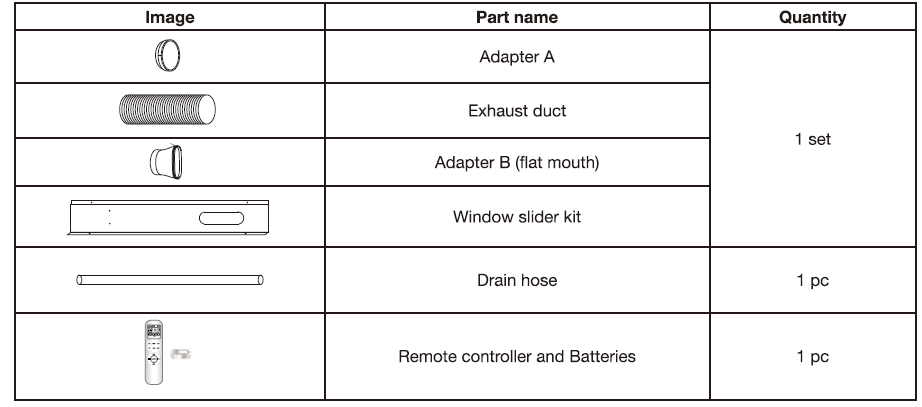
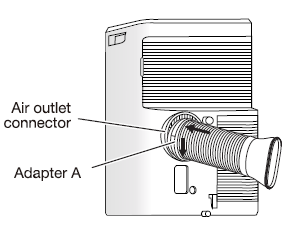
- Install the adapter A and adapter B (flat mouth or round mouth) onto the exhaust duct, as shown in the figure.
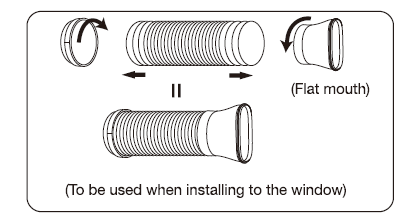
- Connect the exhaust duct to the air outlet connector on the back of the unit. Slide the adapter A downwards until it is locked in place.
Window Slider Kit Installation
- Cut the foam seal (adhesive type) to the appropriate length and attach it to the window sash.
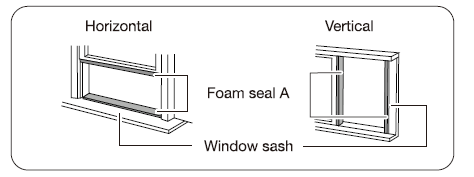
- Attach the Window slider kit to the window sash. Adjust the length of the Window slider kit: Loosen the screw A to adjust the length of the Window slider kit then tighten the screw when the length is appropriate.
NOTE: The length of the Window slider kit is 67.5 cm to 120 cm.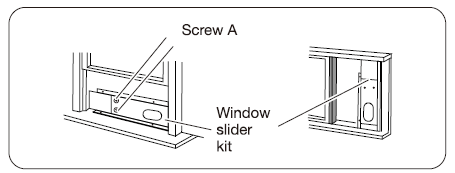
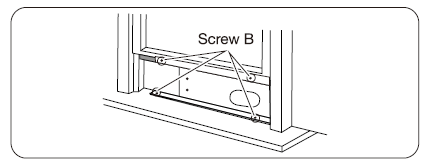
- . Gently lower the window. Secure the vent panel in place with 4 type B screws, plus one screw for each extension.
- Cut the foam seal 8 (non-adhesive) the width of the window.
Secure the foam seal B between the glass and the window to prevent air and insects from entering the room.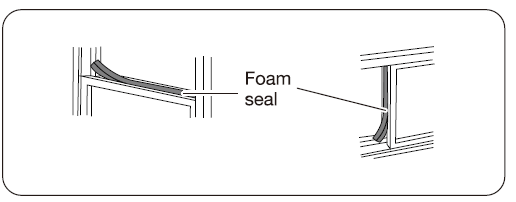
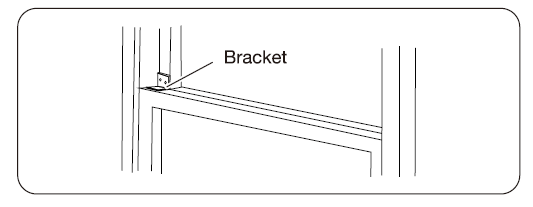
- Install the security bracket with a type B screw, as shown in figure below.
Window Duct Installation
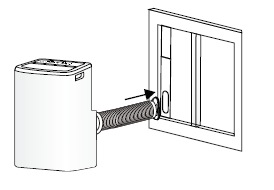
Move the unit with the packed exhaust duct next to the window, and then connect the adapter B (flat mouth) of the exhaust duct with the window, as shown.
Wall Exhaust Installation
- Prepare a hole in the wall. Install the wall exhaust adapter onto the wall by using 4 expansion screw sleeves and type C screws, ensuring it is securely fastened.
- Connect the exhaust duct to the wall exhaust adapter, as shown.
NOTE: Cover the hole using the adapter cap when not in use.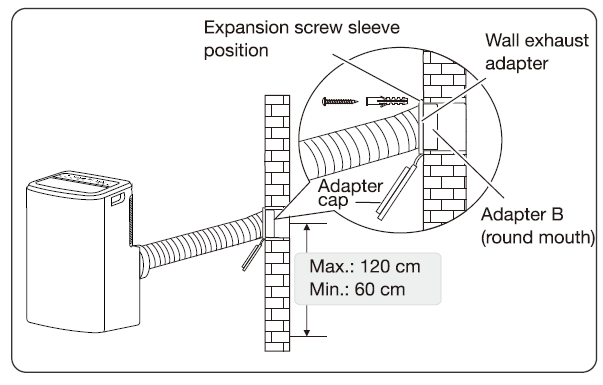
NOTE:
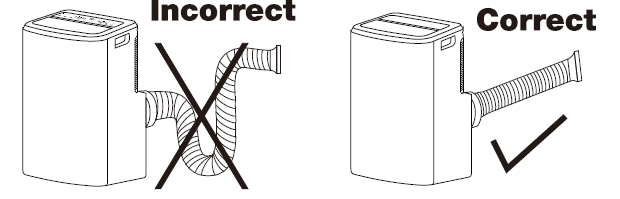
- The duct can be compressed to 270 mm minimum and extended to 1500 mm maximum. It is better to keep the duct length to a minimum.
- Stretching or bending the duct excessively, will affect the cooling efficiency, as shown in the below figure.
Drain Hose Installation
- During Dry mode, remove the upper drain plug from the back of the unit. Attach the drain hose to the hole. Place the other end of the hose into a drain pipe or other appropriate drainage area.
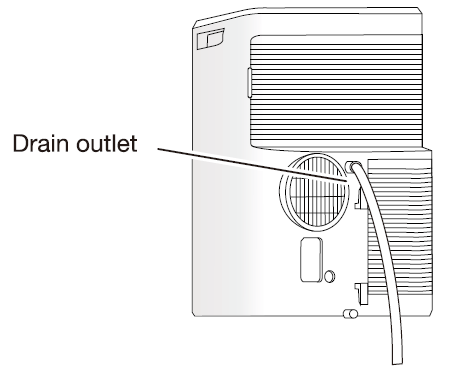
NOTE: Make sure the hose is secure, and there are no leaks. Direct the hose toward the drain, making sure that there are no kinks that will obstruct the water flow. Place the end of the hose into the drain and make sure the end of the hose is pointed downwards. Do not direct the hose upward. - When the water level of the bottom tray reaches a preset level, the digital display area shows “P1” and the WATER FULL indicator light illuminates. Move the unit to a drain location, remove the bottom plug and let the water drain. Reinstall the bottom drain plug and restart the machine until the “P1” symbol disappears. If the error persists, contact customer service.
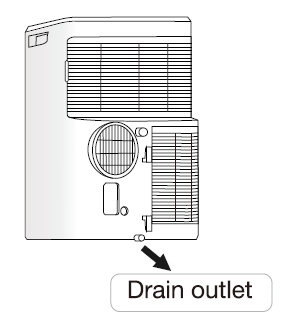
NOTE: Be sure to reinstall the bottom drain plug before using the unit.
USING YOUR AIR CONDITIONER
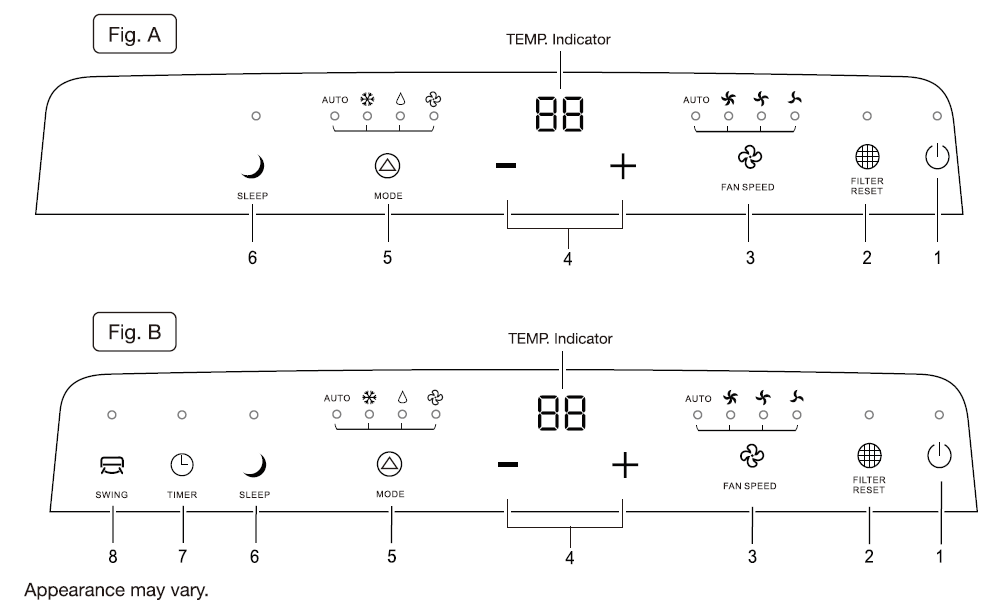
Temperature Indicator
- In cool mode, when the”-” or”+” button is pressed, the temperature setting is displayed and can be adjusted.
- In auto and cool mode, temperature indicator display will show temperature setting options.
- In dry and fan mode, the temperature indicator display will show room temperature options.
Button Functions
- On/Off (Q)) button:
- Press this button to turn the unit on or off.
- Filter Reset(@) button:
- When the unit completes 250 hours of operation, the filter reset indicator light will illuminate. Clean the air filter when the indicator light illuminates or turns on.
- Press the “Filter Reset” button when the filter reset indicator light illuminates. The indicator light will stay illuminated until the unit is powered off.
- Fan Speed ( c8,) button:
- Press this button, to select the fan speed as follows-

The fan speed indicator light illuminates under the selected fan speeds.
NOTE: In fan mode, the auto fan speed option will not work.
- Press this button, to select the fan speed as follows-
- “-“or”+” button:
- Each time the”+” or”-” button is pressed, the temperature setting will increase or decrease by 1 °C or by 1 Of.
- The temperature setting ranges from 60°F (16°C)~ 90°F (32°C).
- Mode (@) button:
- Press this button to select the running mode as follows

The mode indicator light illuminates under different modes.
- Press this button to select the running mode as follows
- Sleep (J) button:
- Press this button to enter sleep mode.
- The unit will exit sleep mode after 8 hours of continuous operation and restore to the previous status.
NOTE: The sleep function can not be activated in fan and dry mode.
USING THE REAMOTE CONTROL
Before Use
- Prior to using the remote control, install the batteries and ensure the”+” and”-” poles are correctly positioned.
- Ensure the remote control is pointed to the signal receiving window, and there is no obstruction between the receiver and the remote.
- The effective range of the remote control is within 24 feet of the unit.
- Do not drop or throw the remote control.
- Do not expose the remote control to liquid or moisture.
- Do not expose the remote control directly to the sunlight or excessive heat.
- If the remote control does not function normally, remove the batteries for 30 seconds before reinstalling them. If that doesn’t work, replace the batteries.
- When replacing batteries, do not mix new batteries with old batteries.
- If the remote control will not be used for a long period, remove the batteries as leakage can damage the remote.
- Ensure you properly dispose of batteries after usage.
NOTE: This is a universal remote control that includes several function buttons. Depending on the specific air conditioner you have purchased, some functions may not be applicable to your unit.
Button Functions Whirlpool Portable Air Conditioner
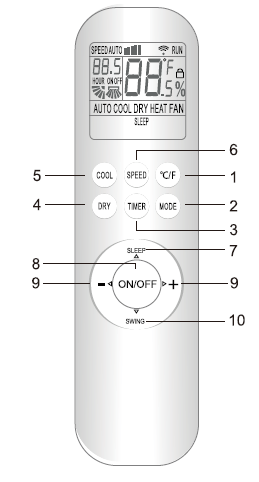
NOTE: All function indicators illuminate during the power sequence. Individual icons illuminate when the corresponding functions are activated.
- TEMPERATURE DISPLAY:
- Press this button to toggle between Fahrenheit and Celsius.
- MODE :
- Each time you press this button, a mode is selected in the sequence outlined below.
- TIMER:
- Press this button once, the “ON/OFF” will flash. Press “+” or “-” to set the number of hours in which the unit will be turned ON/OFF, with an interval of in half hour increments, between 30 minutes and 24 hours.
- Press the timer button again to confirm the setting. The “ON/OFF” will stop flashing.
- If the timer button is not pressed within 1 O seconds after the “ON/OFF” starts flashing, the time setting will be exited.
- If the Timer function is already activated, pressing the Timer (C9) button will turn off the timer.
If the Timer function is off, pressing the Timer (C9) button will turn on the timer.
- DRY MODE;
- Press this button to enter DRY mode.
- COOL MODE ,:
- Press this button to enter COOL mode.
- SPEED:
- Press this button to select the fan speed as follows:
- SLEEP:
- Press this button to enter SLEEP mode.
- ON/OFF:
- Press this button to turn the unit ON/OFF.
- This will clear the existing TIMER and SLEEP settings.
- “+”or”-” button:
- Each time the”+” is pressed, the temperature setting will increase by 1 °C or by 1 ° F and each time the “-” is pressed, it will decrease 1 °C or by 1 ° F.
- The temperature setting ranges from 60° F (16°C)~ 90° F (32°C).
NOTE: The temperature can not be set in AUTO or FAN mode.
- SWING:
- Press this button to activate up/down swing and press it again to fix the swing position.
Usage Whirlpool Portable Air Conditioner
Installing and replacing batteries:
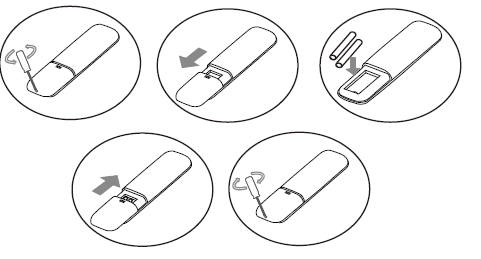
- Use the screwdriver to remove the cover from the housing. Rotate the screwdriver counter-clockwise to remove the screw.
- Slide the cover from housing as indicated above.
- Inset two brand new batteries (AAA), and place them in the correct position (+ and -).
- Slide the cover back over the housing.
- Insert the screw to lock the cover. Rotate the screwdriver clockwise to tighten the screw.
Auto operation mode:
- Press the “MODE” button, select the Auto operation mode.
- Pressing “SPEED” button will not change the fan speed in Auto operation mode. Fan speed will be changed automatically in Auto operation mode.
NOTE: In Auto Mode, the temperature setting is not operational.
Cool operation mode:
- Press the “MODE” button, select the Cool operation mode.
- Press the”+” or”-” button, to set the temperature range from 60° F (16°C) ~ 90° F (32°C). The display will change as you touch the button.
- Press the “SPEED” button, to select the fan speed from LOW, MID, HIGH, AUTO.
CARE AND CLEANING
- Do not use gasoline, benzene, thinner, liquid insecticide, or any other chemicals on the air conditioner, as these substances may adversely impact the unit, and may form cracks, or result in deformation of plastic parts.
- Never attempt to clean the unit by pouring water directly over any of the surface areas, as this will cause deterioration of electrical components and wiring insulation.
Cleaning the Unit
When cleaning the exterior of the unit, use a warm, damp towel. 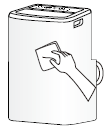
Cleaning the Air Filters
- Remove the upper air filter.
NOTE: To remove the upper air filter, first remove the grille cover. Refer to the figure below.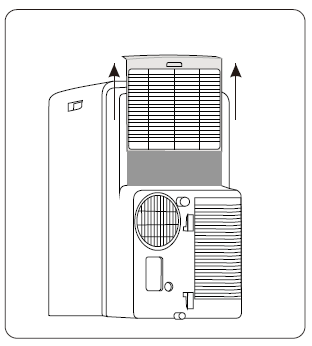
- Clean the upper air filter.
Use a vacuum cleaner to clean the air filter. If the air filter is very dirty, wash it in warm water (below 104° F (40°C)) with a mild detergent, and then dry the filter in a shaded area. - Reinstall the upper air filter and grille to the air conditioner.
- Clean the lower air filter.
Use a vacuum cleaner to clean the lower air filter.
NOTE: Removing the lower air filter from the air conditioner is not required.
SPECIFICATIONS Whirlpool Portable Air Conditioner
| Model | WHAP081BWC | WHAP101BWC | WHAP131BWC |
| Voltage/Frequency | 115 V/60 Hz | 115 V/60 HZ | 115 V/60 HZ |
| Current/Amperage | 9.5 A | 11 A | 11 A |
| Cooling Capacity(BTUs/hour) | 8000 | 10000 | 13000 |
| Seasonally Adjusted Cooling Capacity | 5500 | 6500 | 8000 |
| Coolant Type | R410A | R410A | R410A |
| Timer | 24-hour | 24-hour | 24-hour |
| Dimensions | 13.2″ X 16.1″ X 27.6″ | 13.2″ X 16.1 “X 27.6″ | 18.7″ X 15.2″ X 28″ |
| WxDxH | 33.5 x 40.9 x 70.1 cm | 33.5 x 40.9 x 70.1 cm | 47.5 x 38.6 x 71.1 cm |
TROUBLESHOOTING
| If you experience | Possible Causes | Solution |
| Unit will not operate | The power switch available on the unit is switched off. | Switch on the power. |
| A household fuse has blown. | Replace the fuse by a qualified electrician. | |
| A household circuit breaker has tripped. | Reset the circuit breaker. | |
| Unit will not cool
I |
The temperature setting is not set to a cool enough setting. | Set a proper temperature, temperature setting should be lower than ambient temperature. |
| The air filter is blocked by dust. | Clean the air filter. | |
| The air inlet or outlet of the machine is blocked. | Locate and clear the obstruction. | |
| Room temperature is too high. | Allow appropriate time for the unit to cool the room as cooling time can vary, depending on initial room temperature and other factors. | |
| Cooling capacity is insufficient. | Verify that the product specifications are appropriate room dimensions. | |
| Windows or doors to the outside are open. | Close the doors and windows.
I |
ASSISTANCE OR SERVICE
Before calling for assistance or service, please check
“Troubleshooting.” It may save you the cost of a service call. If you still need help, follow the instructions below.
When calling, please know the purchase date and the complete model and serial number of your appliance. This information will help us to better respond to your request.
In the USA
Call XLS Products Customer Service toll free: 1-800-207-1156.
Our consultants provide assistance with:
- Features and specifications on our full line of appliances.
- Installation information.
- Use and maintenance procedures.
- Accessory and repair parts.
- Specialized customer assistance.
- Referrals to local dealers, repair parts distributors, and service companies. XLS Products designated service technicians are trained to fulfill the product warranty and provide after-warranty service, anywhere in the United States.
For further assistance:
If you need further assistance, you can write to XLS Products with any questions or concerns at:
XLS Products, Inc.
Customer Service
P.O. Box 16262
Philadelphia, PA 19114-0262
Please include a daytime phone number in your correspondence.
In Canada
For further assistance:
If you need further assistance, you can write to XLS Products with any questions or concerns at:
XLS Products, Inc.
Customer Service
P.O. Box 16262
Philadelphia, PA 19114-0262
Please include a daytime phone number in your correspondence.
XLS PRODUCTS WARRANTY
FOR WHIRLPOOL® PORTABLE AIR CONDITIONER
ONE YEAR LIMITED WARRANTY
For one year from the date of purchase, when this product is operated and maintained according to instructions attached to
or furnished with the product, XLS Products will pay for replacement parts and repair labor to correct defects in materials or workmanship or replace the product at our discretion. Service must be provided by a XLS Products designated service company. This warranty does not cover the air filter.
ITEMS XLS PRODUCTS WILL NOT PAY FOR
- Service calls to correct the installation of your product, instruct you how to use your product, to replace house fuses or reset circuit breakers, replace or clean filters, or correct house wiring.
- Service calls to repair or replace air filters. Those consumable parts are excluded from warranty coverage.
- Repairs when your product is used for other than normal, single-family household use.
- Damage resulting from accident, alteration, misuse, abuse, fire, flood, acts of God, improper installation, installation not in accordance with electrical or plumbing codes, or use of products not approved by XLS Products.
- Replacement parts or repair labor costs for units operated outside the United States or Canada
- Pickup and delivery. This product is designed to be repaired in the home.
- Repairs to parts or systems resulting from unauthorized modifications made to the appliance.
- Expenses for travel and transportation for product service in remote locations.
- The removal and reinstallation of your appliance if it is installed in an inaccessible location or is not installed in accordance with published installation instructions.
DISCLAIMER OF IMPLIED WARRANTIES; LIMITATION OF REMEDIES
CUSTOMER’S SOLE AND EXCLUSIVE REMEDY UNDER THIS LIMITED WARRANTY SHALL BE PRODUCT REPAIR AS PROVIDED HEREIN. IMPLIED WARRANTIES, INCLUDING WARRANTIES OF MERCHANTABILITY OR FITNESS FOR A PARTICULAR PURPOSE, ARE LIMITED TO ONE YEAR OR THE SHORTEST PERIOD ALLOWED BY LAW. XLS PRODUCTS SHALL NOT BE LIABLE FOR INCIDENTAL OR CONSEQUENTIAL DAMAGES. SOME STATES AND PROVINCES DO NOT ALLOW THE EXCLUSION OR LIMITATION OF INCIDENTAL OR CONSEQUENTIAL DAMAGES, OR LIMITATIONS ON THE DURATION OF IMPLIED WARRANTIES OF MERCHANTABILITY OR FITNESS, SO THESE EXCLUSIONS OR LIMITATIONS MAY NOT APPLY TO YOU. THIS WARRANTY GIVES YOU SPECIFIC LEGAL RIGHTS AND YOU MAY ALSO HAVE OTHER RIGHTS, WHICH VARY, FROM STATE TO STATE OR PROVINCE TO PROVINCE.
Outside the 50 United States and Canada, this warranty does not apply. Contact your authorized XLS Products dealer to determine if another warranty applies.
If you need service, first see the “Troubleshooting” section of the Use & Care Guide. After checking “Troubleshooting,” additional help can be found by checking the “Assistance or Service” section or by calling XLS Products. In the U.S.A., call 1-800-207-1156.
In Canada, call 1-800-207-1156.
Keep this book and your sales slip together for future reference. You must provide proof of purchase or installation date for in-warranty service.
Write down the following information about your Portable Air Conditioner to better help you obtain assistance or service if you ever need it. You will need to know your complete model number and serial number. You can find this information on the model and serial number label located on the product.
REFRENCES:
https://www.whirlpool.com/home-solutions/Portable-Air-Conditioners.html
https://usermanuals.plus/whirlpool/portable-air-con…oner-user-manual/

Post Views:
16